Set up a New Unreal Vive Wave-SDK Project - Standalone Android
Table of contents
- Follow the “New Project” instructions from the Vive Wave website
- Ensure that your project is compatible with the Android guidelines
- Download and extract Wave Unreal Plugins into the Plugins folder
- Disable all other VR-related plugins
- Try to deploy a simple level to your headset
- Download and extract AR51 Unreal-SDK Plugin and AR51 Wave Plugins into the Plugins folder
- Create a new level
- Be sure to set the visibility of the plugins to True
- Drag the AR51 SDK Blueprint into the current level
- Drag the AR51 Wave-related Blueprints into the current level
- Make sure your VrPawn object uses “stage tracking”
- In AR51 Blueprint, select “HtcVive” as the platform type
- Make sure you added WaveInputManager to the scene to enable Hand support
- In a tethered deployment - enable “Start in VR”
- Hit Play
- On your first run, perform device calibration
Follow the “New Project” instructions from the Vive Wave website
Follow the instructions from the wave website to set up your project
Make Sure to disable “Support Vulkan” and enable “Support OpenGL ES3.1”. Also make sure to select “No MSAA” as the valud for MSAA Sample Count.
Ensure that your project is compatible with the Android guidelines
Follow the instructions from the unreal android guidelines to get setup up your project
Download and extract Wave Unreal Plugins into the Plugins folder
Download Meta’s plugin from wave unreal plugin. Extract the plugin into the project “Plugins” folder and restart the unreal editor.
Disable all other VR-related plugins
Especially disable: OpenXR, OculusVR, and SteamVR to prevent conflicts.
Enabling multiple VR plugins might cause unexpected results.
Try to deploy a simple level to your headset
Try and build the project and deploy it to your headset.
Download and extract AR51 Unreal-SDK Plugin and AR51 Wave Plugins into the Plugins folder
Your plugins folder should look like this 
Restart the editor to enable the plugins.
Create a new level
File -> New Level -> Basic
Be sure to set the visibility of the plugins to True
In the Content Browser window. Select settings and enable “Show Plugin Content”
Drag the AR51 SDK Blueprint into the current level
From the “Content Browser” windows, select Plugins -> AR51 SDK Content -> Blueprints and drag “AR51SDK_Blueprint” into the level.
Drag the AR51 Wave-related Blueprints into the current level
From the “Content Browser” windows, select Plugins -> AR51SDK_WAVE Content -> Blueprints and drag: “VRPawn”, “WaveBoundary Adapter_BP” and “WaveHands Adapter_BP” into the level.
Make sure your VrPawn object uses “stage tracking”
Either create a new VRPawn object (using these instructions) or edit the provided VRPawn Blueprint. Make sure that your tracking space is set to “Stage”. ![]()
If you do not set the tracking mode to “Stage”, the skeleton will not appear on your body after once you restart the VR application.
In AR51 Blueprint, select “HtcVive” as the platform type
From the Details panel, Under “General”, you should see a field “Platform”. Please select “HTC Vive” 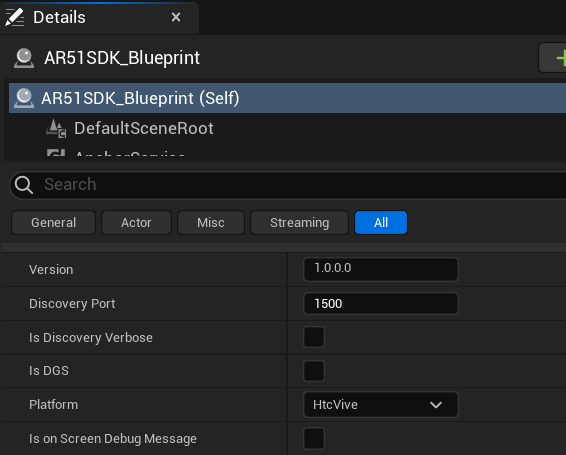
Make sure you added WaveInputManager to the scene to enable Hand support
In the details-pannel of WaveInputManager under Hand, make sure to enable “Natural Hand” 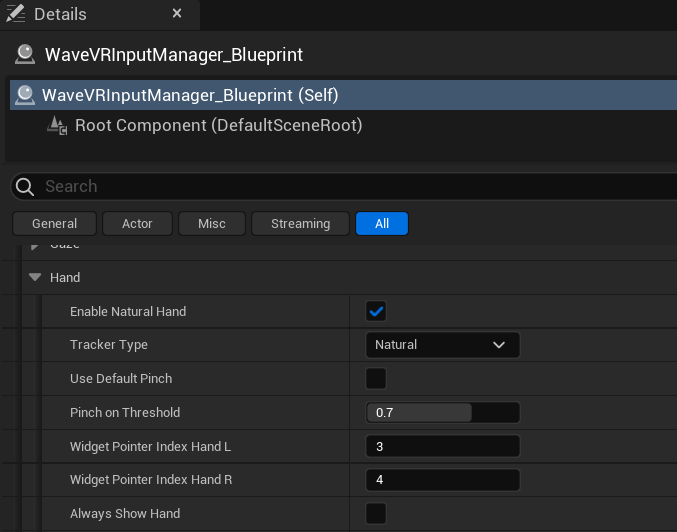 :
:
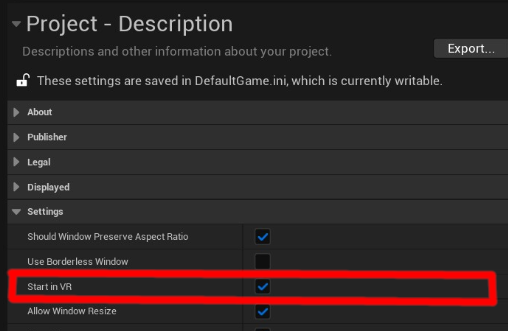
In a tethered deployment - enable “Start in VR”
Before deploying to a tethered application (PC VR app), be sure that you project is set to start in VR. In “Unreal engine”, under “Project Settings” -> “Project Description” enable “Start in VR”.
Hit Play
Make sure that AR51’s system is running on the same local network as your device.
You should see the character move in realtime.  .
.
On your first run, perform device calibration
You should now perform device calibration so that the character would position on your body.