Character Assignment in AR 51 (Unreal SDK)
How to setup character assignment on Unreal Engine.
Table of contents
- Overview
- VR & Multi-User Character Sync
- Understanding EntityId vs PersonId
- Auto Character Assignment Mode
- Assigning Characters
AR 51 provides flexible and precise control over which character blueprint is assigned to each tracked person in the system. This guide is specific to the Unreal SDK and is intended for developers and creators integrating AR 51 into Unreal Engine environments.
Overview
When a new person is detected in the capture area, AR 51 automatically determines which character should be assigned. This logic is handled internally and follows a priority-based decision tree:
- Active Person Override (typically the person wearing the local headset in VR)
- Character from Skeleton Data (
characterprefabfield shared across devices) - EntityId to Character Mapping (persistent, privacy-safe identity)
- PersonId to Character Mapping (temporary per-session identity)
- Auto Assignment Mode fallback
VR & Multi-User Character Sync
In VR setups, the Active Person is automatically identified as the user closest to the headset.
- If a local user selects a character (e.g., “CharacterA”), this is shared with the AR 51 server.
- Other connected devices (e.g., additional headsets or Unity clients) receive this info and display that person as “CharacterA”.
- If another headset selects “CharacterB” later, both users will see each other correctly across all systems.
This ensures consistent character representation across all clients, even in multiplayer or cross-platform setups.
What is the Active Person?
The Active Person is the person currently wearing the VR headset tracked by the local system. This person is automatically detected by proximity to the camera or anchor.
In multi-user VR scenarios, each device identifies its own Active Person and selects a character for them. This selection is then propagated to all connected devices via the characterprefab field in the skeleton data, ensuring synchronized identity and visual representation.
Understanding EntityId vs PersonId
| Identifier | Purpose | Lifespan |
|---|---|---|
PersonId | Temporary session ID (a.k.a. SkeletonId) | Valid only while the person is tracked |
EntityId | Persistent ID assigned to recurring people | Survives across sessions, device-safe |
AR 51 can identify people after just a few seconds in the capture space, assigning them an EntityId. When they return in the future, they are recognized and assigned the same ID — enabling persistent identity without storing personal information.
 Shows how to configure character blueprints for recurring people via EntityId and PersonId.
Auto Character Assignment Mode
When no explicit mapping is found, the Auto Assignment Mode determines which character to assign:
- Default: Uses the first valid blueprint in the
CharacterBlueprintslist. - Cycle: Assigns characters sequentially for variety.
- Random: Picks a character randomly from the list.
 Shows the dropdown used to choose the auto assignment strategy.
Assigning Characters
Using the Details Panel (Editor Setup)
You can map specific characters to people or entities using the following editable fields:
- Person Id to Character BP Map: Maps temporary session IDs.
- Entity Id to Character BP Map: Maps persistent identities.
Example showing where to configure character mapping in the Details panel.
Using Blueprints (Runtime Control)
You can assign characters dynamically using Blueprint logic:
GetSingletone()->SetActiveCharacter("CharacterName");
GetSkeletonConsumerInstance()->SetCharacterByPersonId("PersonId123", "CharacterName");
GetSkeletonConsumerInstance()->SetCharacterByEntityId("EntityId456", "CharacterName");
These are exposed as BlueprintCallable methods and can be used in UI, initialization flows, or live triggers.
 Blueprint example of setting the character for the Active Person.
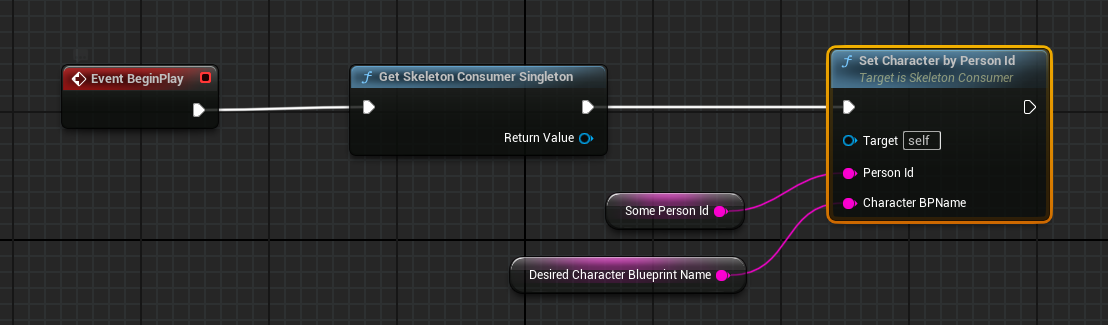 Blueprint example of assigning a character to a PersonId.
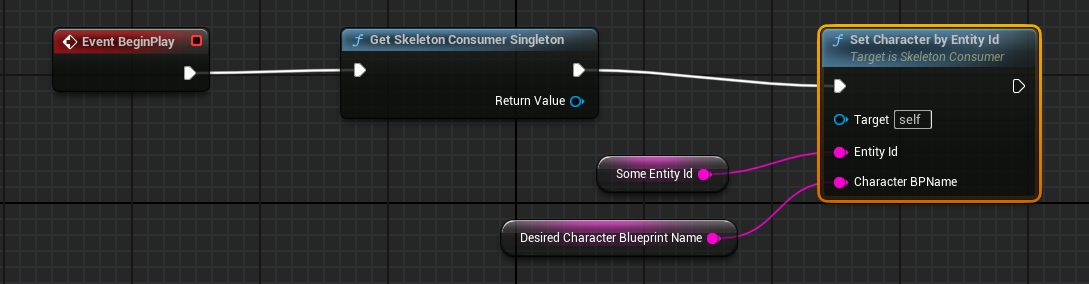 Blueprint example of assigning a character to an EntityId.
Access via C++ (Advanced)
If you’re working in C++, you can use the static singleton accessor:
USkeletonConsumer::Instance()->SetCharacterByEntityId("entity_123", "MyCharacterBP");
Or directly modify the maps:
USkeletonConsumer::Instance()->PersonIdToCharacterBPMap.Add("temp_123", "MyCharacterBP");